THE CLOUD
The Cloud is an Arduino - LED based Interactive Thounderstorm in Your House
You can go ahead and purchase one from online at https://www.rclarkson.com/products/smart-cloud for only $3,360.
Or you can follow these instructions and do it yourself [DIY] from about $150. If you interested to build one of your own, feel free to read along as we guide you through what you need and how to make it step by step. Of course you will need to have some tools like soldering iron, wire-stripper, drill and some other hand tools, but if you still reading we assume as a regular DIY person, you should already have all these handy and ready to roll... ;)
Materials you need:
For your convenience, we have already placed the links below for an easier and faster purchase process.
| # | Link | Description | pcs | Link |
|---|---|---|---|---|
| 1 |  |
AC/DC Wall Mount Adapter 12V 24W | 1 | |
| 2 |  |
Power Connector Jack 2.1x5.5mm Solder | 1 | |
| 3 |  |
BINZET DC Converter Step Down Regulator 5V Regulated Power Supplies Transformer Converter (5V 10A 50W) | 1 | |
| 4 |  |
CAP ALUM POLY 470UF 20% 16V T/H | 1 | |
| 5 |  |
Led Strip 16.4ft 300LEDs Individually Addressable Led Light,SMD5050 RGB Magic Color Flexible Rope Lights (Non-Waterproof) | 1 | |
| 6 |  |
Arduino Nano V3.0 with ATMEGA328P Mini Module Board | 1 | |
| 7 |  |
Linear Voltage Regulator IC Positive Fixed 1 Output 6V 1A TO-220AB | 1 | |
| 8 |  |
100µF 10V Aluminum Polymer Capacitor Radial, Can 16 mOhm 5000 Hrs @ 105°C | 1 | |
| 9 |  |
MAX4466 Microphone Pre-Amp Audio Evaluation Board | 1 | |
| 10 |  |
0.1µF 100V Aluminum Electrolytic Capacitors Radial, Can 2000 Hrs @ 85°C | 1 | |
| 11 |  |
Pyroelectric Infrared PIR Motion Sensor Module, Longruner 10 x HC-SR501 Human Sensor Module Pyroelectric Infrared PIR Motion Sensor for Arduino UNO R3 Mega 2560 Nano LKY65 | 1 | |
| 12 |  |
10 kOhms 0.5W, 1/2W PC Pins Through Hole Trimmer Potentiometer Cermet 1 Turn Top Adjustment | 1 | |
| 13 | |
Arduino Nano V3.0 with ATMEGA328P Mini Module Board | 1 | |
| 14 | |
Linear Voltage Regulator IC Positive Fixed 1 Output 6V 1A TO-220AB | 1 | |
| 15 | |
100µF 10V Aluminum Polymer Capacitor Radial, Can 16 mOhm 5000 Hrs @ 105°C | 1 | |
| 16 |  |
PCB Mounting Infrared IR Receiver Detector 2.7-5.5V | 1 | |
| 17 | 2K Resistor | 2 kOhms ±5% 0.25W, 1/4W Through Hole Resistor Axial Flame Retardant Coating, Safety Carbon Film | 1 | |
| 18 |  |
Lights Remote Control | 1 | |
| 19 |  |
Storage Crate, White | 1 | |
| 20 | Iboco T1E series open slot thin finger wire duct, 1.5in width, 4in height, 6.5ft/2m length, gray. Cover included. | 1 | ||
| 21 |  |
40 Pin Male to Female Dupont Wire, Breadboard Jumper wire Ribbon Cables kit for Arduino Raspberry Pi | 1 | |
| 22 |  |
Fairfield Quilter's 80/20 - Crib Size 45" x 60" | 1 | |
| 23 |  |
Poly-Fil Supreme Ultra Plush Fiberfill, 12 oz Bag | 1 |
Tools You Need
- Soldering iron
- Multimeter
- Wire strippers
The Circuit Schematic
These are the complete circuit schematics where you can see how you can connect everything together.
The LED Controller Circuit
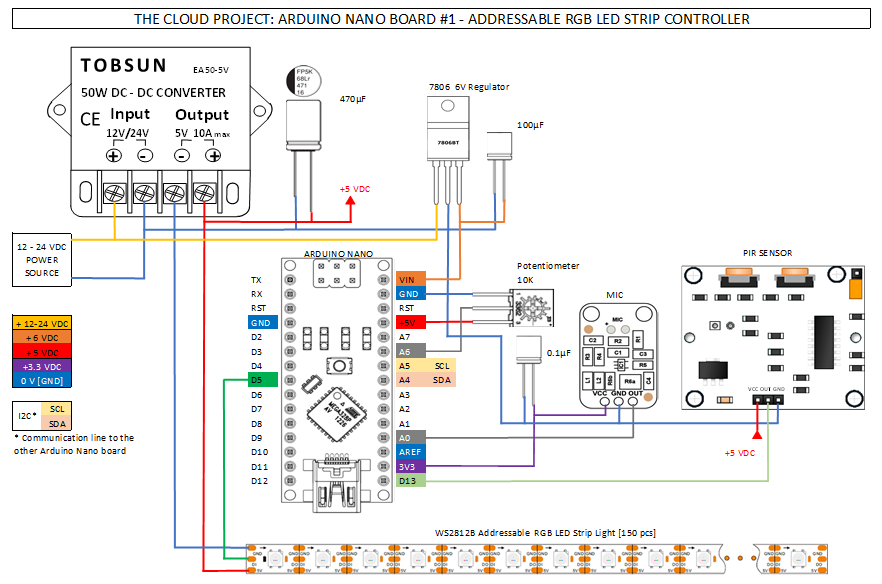
We are going to use an AC/DC Wall Mount Adapter 12V 24W, which should be able to give us enough power to supply the Arduino boards as well as the LED strip. However, both of these units require 5 VDC power, therefore we are using a BINZET DC-DC Converter aka Step Down Regulator. To ensure smoother power source we can use a 470 µF capacitor on the 5 VDC side. Also, to power each Arduino board, we are using 7806BT 6 VDC Regulator, which we connect a 100 µF capacitor for smoother operation. The digital LED strips are the ones we will use in this project. In particular: we will use the WS2812 in our project. The cool part of a digital strip is that you address each LED individually, making very cool effects easy. Obviously the kind we’d like to use in our projects. So we connect the 5 VDC output from the BINZET DC-DC Converter to the LED strip [5V] and [GND] labeled soldering point, which will supply the power source for the entire LED strip. At this point none of the LED will be able to light up, as we will need to tell each and every LED with what color do we want to use them. For this purpose we need use the Arduino [D5] - digital output what needs to be connected to the 3rd soldering point of the LED strip called [DI].
By the way, if you ever planning to design any circuit on your own, we highly recommend using the Fritzing.org Freeware Software package.
And for sure you will need to download and install the Arduino IDE application. This is the key for any Arduino project: https://www.arduino.cc/en/Main/Software
The Infrared Remote Controller Circuit
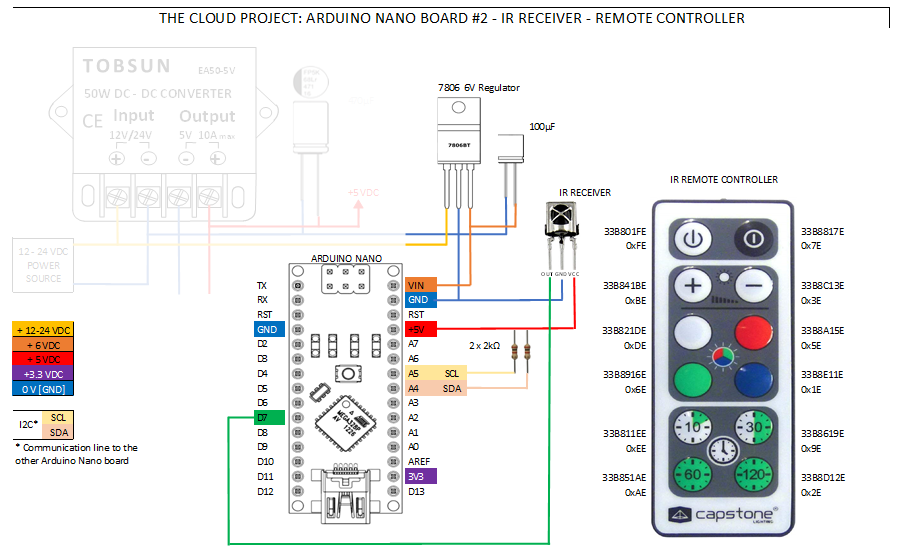
Arduino code for the Remote Controller module
/*Quick and dirty IR signal over i2c rebroadcast forLighting Cloud Mood Lamp By Zoltan GedayUsed to get around the limitations of having two libraries that both require exact timings to work right!*/#include <Wire.h>#include <IRremote.h>int RECV_PIN = 7;IRrecv irrecv(RECV_PIN);decode_results results;void setup(){Wire.begin(); // Start I2C Bus as MasterSerial.begin(115200);irrecv.enableIRIn(); // Start the receiver}void loop() {if (irrecv.decode(&results)) {if(results.value != 0xFFFFFFFF){Serial.println(results.value,HEX);//only transmit if its not a repeat value. theyre useless. you may need to// adjust for your own remote repeat valuesWire.beginTransmission(9);Wire.write(results.value);Wire.endTransmission();}irrecv.enableIRIn();irrecv.resume(); // Receive the next value}}
Arduino code for the Addressable RGB LED Strip Controller
/*Lighting Cloud Mood Lamp By Zoltan GedaySound sampling code originally by Adafruit Industries. Distributed under the BSD license.This paragraph must be included in any redistribution.*/#include <Wire.h>#include "FastLED.h"// How many leds in your strip?#define NUM_LEDS 150#define DATA_PIN 5// Mode enumeration - if you want to add additional party or colour modes, add them here; you'll need to map some IR codes to them later;// and add the modes into the main switch loopenum Mode { CLOUD,ACID,OFF,ON,RED,GREEN,BLUE,FADE};Mode mode = CLOUD;Mode lastMode = CLOUD;// Mic settings, shouldn't need to adjust these.#define MIC_PIN 0 // Microphone is attached to this analog pin#define DC_OFFSET 0 // DC offset in mic signal - if unusure, leave 0#define NOISE 10 // Noise/hum/interference in mic signal#define SAMPLES 10 // Length of buffer for dynamic level adjustmentbytevolCount = 0; // Frame counter for storing past volume dataintvol[SAMPLES]; // Collection of prior volume samplesint n, total = 30;float average = 0;// used to make basic mood lamp colour fading featureint fade_h;int fade_direction = 1;// Define the array of ledsCRGB leds[NUM_LEDS];void setup() {// this line sets the LED strip type - refer fastLED documeantion for more details https://github.com/FastLED/FastLEDFastLED.addLeds<WS2812B, DATA_PIN, GRB>(leds, NUM_LEDS);// starts the audio samples array at volume 15.memset(vol, 15, sizeof(vol));Serial.begin(115200);Wire.begin(9); // Start I2C Bus as a Slave (Device Number 9)Wire.onReceive(receiveEvent); // register event}void receiveEvent(int bytes) {// Here, we set the mode based on the IR signal received. Check the debug log when you press a button on your remote, and// add the hex code here (you need 0x prior to each command to indicate it's a hex value)while(Wire.available()){unsigned int received = Wire.read();Serial.print("Receiving IR hex: ");Serial.println(received,HEX);lastMode = mode;switch(received){case 0x3F:mode = ON; break;case 0xBF:mode = OFF; break;case 0x2F:mode = CLOUD; break;case 0xF:mode = ACID; break;case 0x37:mode = FADE; break;case 0x9F:mode = BLUE; break;case 0x5F:mode = GREEN; break;case 0xDF:mode = RED; break;}}}void loop() {// Maps mode names to code functions.switch(mode){case CLOUD: detect_thunder();reset();break;case ACID: acid_cloud();reset();break;case OFF:reset();break;case ON: constant_lightning();reset();break;case RED: single_colour(0);break;case BLUE: single_colour(160);break;case GREEN: single_colour(96);break;case FADE: colour_fade();break;default: detect_thunder(); reset();break;}}// Makes all the LEDs a single colour, see https://raw.githubusercontent.com/FastLED/FastLED/gh-pages/images/HSV-rainbow-with-desc.jpg for H valuesvoid single_colour(int H){for (int i=0;i<NUM_LEDS;i++){leds[i] = CHSV( H, 255, 255);}//avoid flickr which occurs when FastLED.show() is called - only call if the colour changesif(lastMode != mode){FastLED.show();lastMode = mode;}delay(50);}void colour_fade(){//mood mood lamp that cycles through coloursfor (int i=0;i<NUM_LEDS;i++){leds[i] = CHSV( fade_h, 255, 255);}if(fade_h >254){fade_direction = -1; //reverse once we get to 254}else if(fade_h < 0){fade_direction = 1;}fade_h += fade_direction;FastLED.show();delay(100);}void detect_thunder() {n = analogRead(MIC_PIN); // Raw reading from micn = abs(n - 512 - DC_OFFSET); // Center on zeron = (n <= NOISE) ? 0 : (n - NOISE); // Remove noise/humvol[volCount] = n; // Save sample for dynamic levelingif(++volCount >= SAMPLES) volCount = 0; // Advance/rollover sample countertotal = 0;for(int i=0; i<SAMPLES; i++) {total += vol[i];}// If you're having trouble getting the cloud to trigger, uncomment this block to output a ton of debug on current averages.// Note that this WILL slow down the program and make it less sensitive due to lower sample rate./*for(int t=0; t<SAMPLES; t++) {//initial data is zero. to avoid initial burst, we ignore zero and just add the current lSerial.print("Sample item ");Serial.print(t);Serial.print(":");Serial.println(vol[t]);}Serial.print("total");Serial.println(total);Serial.print("divided by sample size of ");Serial.println(SAMPLES);Serial.print("average:");Serial.println(average);Serial.print("current:");Serial.println(n);*/average = (total/SAMPLES)+2;if(n>average){//Serial.println("TRIGGERED");reset();//I've programmed 3 types of lightning. Each cycle, we pick a random one.switch(random(1,3)){//switch(3){case 1:thunderburst();delay(random(10,500));// Serial.println("Thunderburst");break;case 2:rolling();// Serial.println("Rolling");break;case 3:crack();delay(random(50,250));// Serial.println("Crack");break;}}}// utility function to turn all the lights off.void reset(){for (int i=0;i<NUM_LEDS;i++){leds[i] = CHSV( 0, 0, 0);}FastLED.show();}void acid_cloud(){// a modification of the rolling lightning which adds random colour. trippy.//iterate through every LEDfor(int i=0;i<NUM_LEDS;i++){if(random(0,100)>90){leds[i] = CHSV( random(0,255), 255, 255);}else{leds[i] = CHSV(0,0,0);}}FastLED.show();delay(random(5,100));reset();//}}void rolling(){// a simple method where we go through every LED with 1/10 chance// of being turned on, up to 10 times, with a random delay wbetween each timefor(int r=0;r<random(2,10);r++){//iterate through every LEDfor(int i=0;i<NUM_LEDS;i++){if(random(0,100)>90){leds[i] = CHSV( 0, 0, 255);}else{//dont need reset as we're blacking out other LEDs herleds[i] = CHSV(0,0,0);}}FastLED.show();delay(random(5,100));reset();}}void crack(){//turn everything white brieflyfor(int i=0;i<NUM_LEDS;i++) {leds[i] = CHSV( 0, 0, 255);}FastLED.show();delay(random(10,100));reset();}void thunderburst(){// this thunder works by lighting two random lengths// of the strand from 10-20 pixels.int rs1 = random(0,NUM_LEDS/2);int rl1 = random(10,20);int rs2 = random(rs1+rl1,NUM_LEDS);int rl2 = random(10,20);//repeat this chosen strands a few times, adds a bit of realismfor(int r = 0;r<random(3,6);r++){for(int i=0;i< rl1; i++){leds[i+rs1] = CHSV( 0, 0, 255);}if(rs2+rl2 < NUM_LEDS){for(int i=0;i< rl2; i++){leds[i+rs2] = CHSV( 0, 0, 255);}}FastLED.show();//stay illuminated for a set timedelay(random(10,50));reset();delay(random(10,50));}}// basically just a debug mode to show off the lightning in all its glory, no sound reactivity.void constant_lightning(){switch(random(1,10)){case 1:thunderburst();delay(random(10,500));// Serial.println("Thunderburst");break;case 2:rolling();// Serial.println("Rolling");break;case 3:crack();delay(random(50,250));// Serial.println("Crack");break;}}